The Canoe Build
I have wanted to build a boat for a long time now. Sometimes I wanted to build a sailboat, and at other times, a rowboat. This time, I decided on a canoe. I figured, if I built something, I needed somewhere to store it, some way to carry it, and some reason to have it. A canoe is really the only realistic option, and it has taken over the whole garage for two months (at the time of writing this blog).
This post will chronicle the building of this canoe. I hope to look back on it fondly when I am out paddling. And maybe serve as guide when I build a second one…
January 12, 2023: The Kit
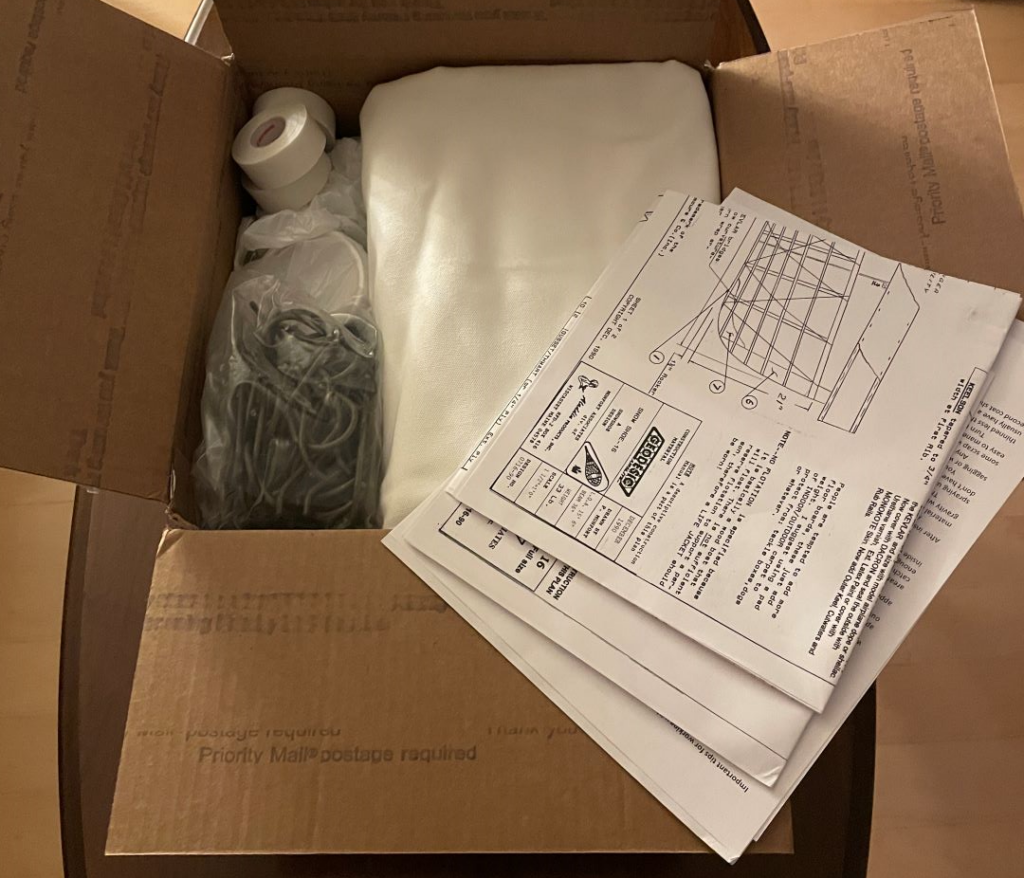
I chose a 16-foot canoe design from Geodesic Airolite boats. This choice is big enough for me, Liz, camping gear, and one day, a dog. It is a good balance for us and our needs without being too big to fit in the garage once it is complete. The kit I chose came with two sheets of plans, some clamps, and the Dacron skin for the boat.
This is a skin-on-frame design. Unlike most home-built canoes that are cedar strip, mine will be a lightweight frame made of wood that has waterproofed fabric stretched over it. The result is a less durable, but very light boat. In addition to the reduction in weight is a reduction in material cost. Especially when compared to a Kevlar boat of similar weight, mine will be a tenth of the cost.
January 14, 2023: Start
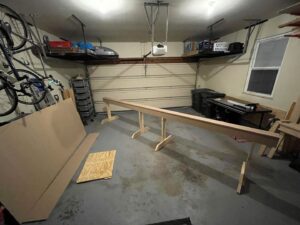
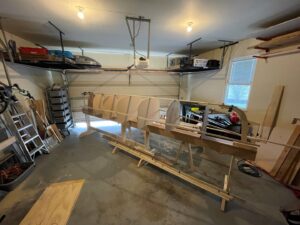
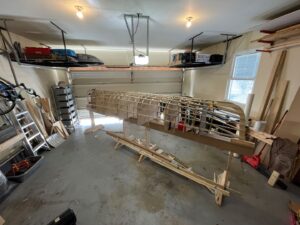
The first weekend of building is a very exciting time, but the progress may not look so thrilling. When you build a boat, you need a foundation to build on. My first project was to gather materials and build a Strongback. A Strongback can be thought of as a specialized workbench for boat building. Mine is built out of 3/4-inch MDF. I tried to make it a straight and flat as possible. I honestly think I did a good job.
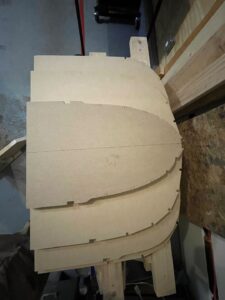
Day 2 of my first weekend of building is for the mold frames. These are used to shape the stringers into the shape of a canoe. These are made of 1/2-inch MDF, and came out OK. They look really good, but required a lot of adjustments after the stringers were made to ensure everything fit the way I wanted it to.
This first weekend of work felt really good, though the product is far from a boat.
January 21, 2023: Mounting the Frames
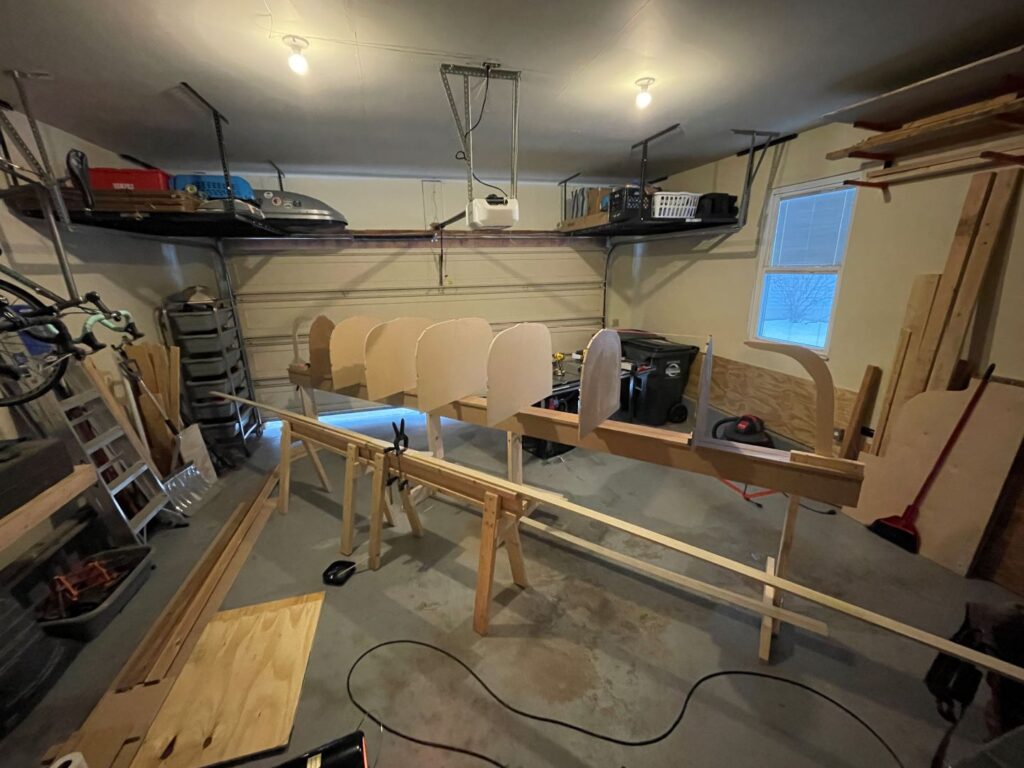
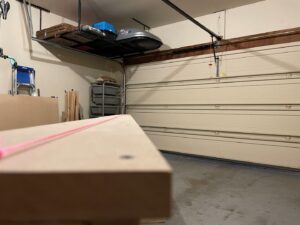
More pre-build this weekend. The mold frames that were made last week were mounted, square and perpendicular, to my Strongback, and the keels were put in as well. It is important to get this right as it will determine the quality and symmetry of the finished boat. I really took my time here to get my measurements right, and make sure everything looked good to the eye.
This is really the first time you can begin to see the lines of the boat and get a sense of scale. It feels bigger than expected, despite knowing the full measurements.
In addition to setting the frames, I also bought the poplar boards that will be the structure of the boat. I also made my first cuts, scarf joint, and glue-up for the keelson. The keelson is a 2-inch x 3/8-inch board that runs the length of the bottom of the boat. Every piece of lumber that runs the length of the boat is glued up from 10-foot pieces with a scarf joint. A scarf joint is a cut across the end grain of the board that is done on both ends to increase the surface area of the glue. Each glue up requires 24 hours to cure, as the working temperature of the epoxy is much higher than I can maintain in the garage.
January 28, 2023: Stringers
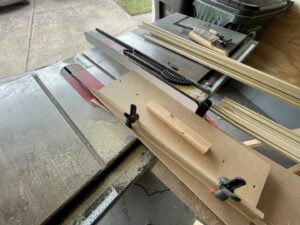
Stringers are the boards that run the length of the boat and the two at the top are called the gunnels. This weekend, I cut all the stringers and gunnels from the boards that I purchased, cut the scarf joints, and glued and mounted the gunnels. This part of the project took a long time to do and was exhausting.
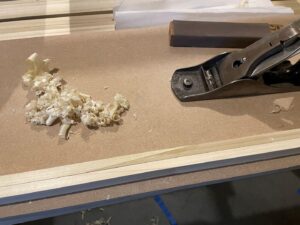
Ripping the stock into stringers was the most time-consuming part. There are ten stringers, which means twenty pieces and 10 glue-ups. I made a jig for the table saw to assist with accuracy and speed. My favorite part of this process has been cleaning up the joints with my hand plane. It is very satisfying to use an antique tool that I restored. I did not completely finish my glue-up this weekend. I did, however, finish the gunnels and get them mounted, which gives a nice impression of the boat. Each stage reveals a more boat-like structure. But, as one friend continues to remind, the holes are still far too big, and water will certainly get in.
February 5, 2023: Stringers Mounted
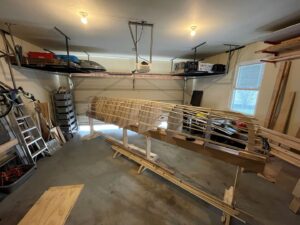
Not much was accomplished this weekend. I really underestimated how long the stringers would take to glue and prepare. They are all mounted, however, and show nice fair lines through the full length of the canoe. The next step is to join the stringers to the keels, which I am going to have to think about before I can take any action.
February 10, 2023: Stringers Finished
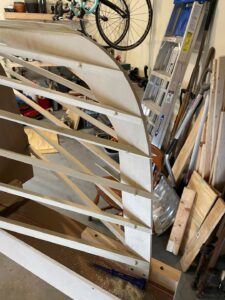
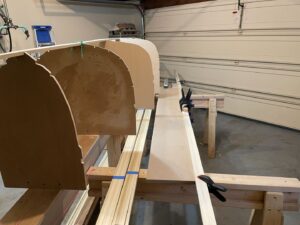
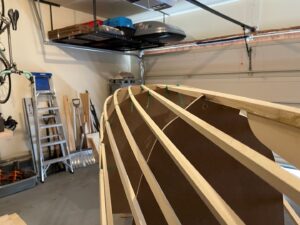
The stringers are finally done. I would not have suspected that these would take three weeks to complete, but here we are. The cuts to join the stringers to the keels are very complicated. I got better as I went but they were no easy task. Each stringer is a compound cut that cannot be messed up. Then, I had to find a way to clamp each joint while the epoxy cured, as they are mounted at angles that did not allow my spring clamps to grip. My solution was to drill a hole through the stringers and keels to pin the whole assembly together. The overhang of the pins allowed the clamps to stay in place during the cure. All together, a very complicated process. I owe my success to a pull saw that I bought for this boat and the patience to not make cuts until I was sure that I could make them right.
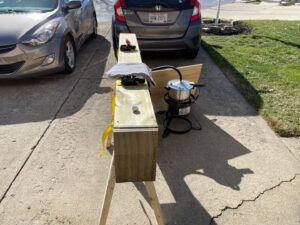
With the weight of the stringers off my shoulders, I turned my attention to the steam process. I assembled a simple steam box and modified a pressure cooker that I picked up from Goodwill for the purpose. A quick job, but it meets the requirements. Now, I just need to borrow a turkey fryer from Dad.
February 13, 2023: Steam Bending
Two posts this weekend because Liz and I took some time off work.
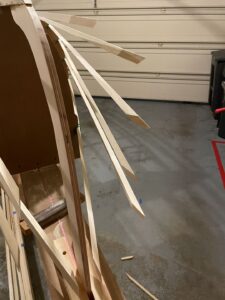
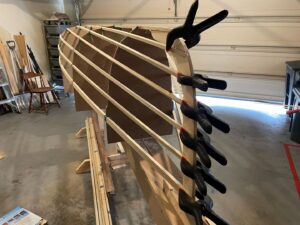
The ribs that I prepared were soaked overnight and then loaded into the steam chamber for 30 minutes. This turned out to be not as long as I needed, so I will do longer times for the next batch. After steaming, each rib gets clamped into place to dry before it can be glued.
Liz assisted in this part of the build and seems to have caught the bug for crafting. She was a great assistant in the shop, as the wood only remains pliable for a short period.
June 4, 2023: Finally done with the Ribs
The ribs took WAY longer than I expected. In my original timeline, I was finishing up this week. That’s a weak estimate from someone who has never built a boat before, but still. I was very wrong.
The problem is part my fault for taking on yet another hobby while still in the middle of this project. Part of it is to blame on everyone wanting to hang out every weekend now that the weather has improved. Finally, part of the problem is that the epoxy I have requires temperatures over 55 to cure.
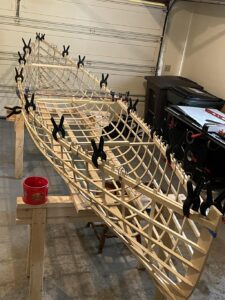
Each rib has 13 glue joints. And each glue joint needed to be measured, clamped, cured, and cleaned on all 4 sides. It was an enormous amount of work, but finally it is done.
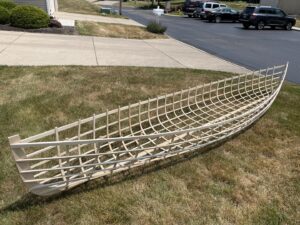
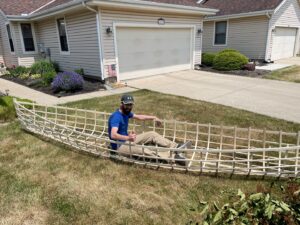
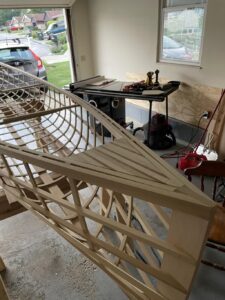
This weekend Logan came over and helped me to remove the canoe frame from the strongback. And I am very pleased to see the progress at this stage. I hope you enjoy the pictures below.
March 16, 2025: It’s Been a Minute
The astute of you will notice it has been a long time since I have updated this page. I have made some undocumented progress on the build, but mostly I have neglected the progress and settled into the rhythm of daily life.
Having made such steady and significant progress up to this point, I don’t really know where I lost my momentum. Summer lead to bike rides in our free time, camping, road trips, and many, many stargazes. Life’s events began to stack up, and eventually the momentum that I had worked so hard to maintain drifted away.
I think part of the problem is that once the canoe came off of the strongback, and I was able to reclaim the garage for other uses, I immediately hung the project up. Literally, hung it up from the ceiling. Having moved the canoe from constant view, I gave myself a barrier to working on it.
Despite the long break from making any entries about the canoe build, I have made some small progress.
•July 16, 2023 Inwales
•July 23, 2023 Decks
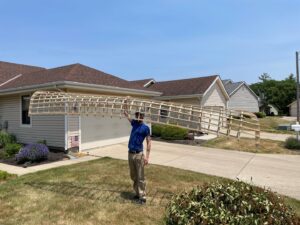
•October 9, 2023 Ceiling Mount
•November 4, 2023 New Tool; 6″ Jointer
•November 26, 2023 Router Lift Install
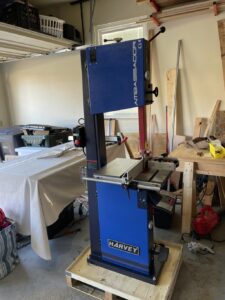
•April 13, 2024 New Tool; 14″ Band Saw
•May 2, 2024 220v Extension Cable
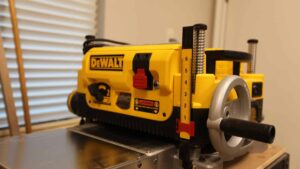
•June 24, 2024 New Tool; Dewalt Thickness Planer
•March 16, 2025 Floorboards
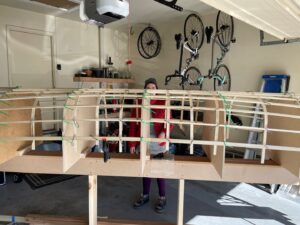
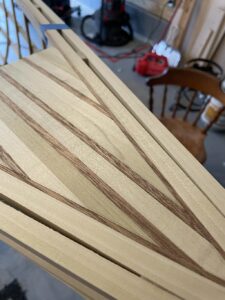
Back in July 2023 I finished the inwales and decks. The inwales sandwich the end of the ribs around the perimeter of the boat. In addition to making the inside of the boat much less likely to catch on clothes and more comfortable to the hand, these make the boat much stiffer. When first removing it from the strongback, it is tough enough to hold shape, but the inwales make that shape much more rigid. The decks, I am very proud of. These are made simply like one might make a cutting board. Scrap wood glued into panels. You can see in the pictures that I decided to make a simple pattern of poplar and mahogany with mahogany leading lines that enter a point at the bow and stern. These were made almost entirely by hand as I did not have the thickness planer or jointer at the time I made them.
Next up was the ceiling mount. This, even for the slowdown it caused me was definitely worth the work. Without it, the canoe took up the whole garage, and it was nice to be able to finally move it out of the way for a time and organize.
With a little room in the garage, I was gifted a hefty 6″ Craftsman jointer. This was not really a tool that I needed, and not one that I wanted very much. But I can’t say no to a tool, and I love restoring old tools to new life, besides. In the end it is a welcome addition to the shop, and I finally have given up hope of ever returning my car under this roof.
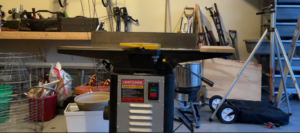
Also back in November ’24 I installed my router lift into my table saw. Until this point I had been holding out hope to replace that wing of the saw with a cast iron table section. But, I could not justify the cost for something I use so infrequently. This was not something directly related to the canoe project, as is the case with the jointer. Still shop improvements are part of the process of a long-term project.
A tool that is integral to the canoe project is a band saw. I knew back when I bought the material for the Canoe floor, or sole, that I would need to re-saw some of the stock. The process of re-sawing involves taking cutting a board down its full length to make it thinner. This is a process that is not usually done on a table saw, as it is dangerous and impractical. the cuts are typically done on a band saw, then made smooth in a thickness planer. This particular band saw was on my radar for some time, and I finally made the purchase for my birthday. Moving this big saw onto the mobile base by myself was one of the toughest tool installs that I have done to date. The times that I have an excuse to use this saw are a pure joy. It is one of my favorite tools next to the table saw.
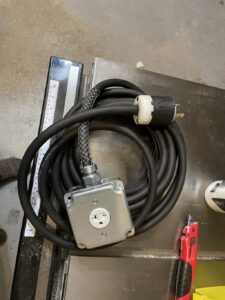
With the band saw, I needed a new method of connecting my 220v power tools. The table saw had been at this point basically tied to the wall. And the band saw could not be used at all unless the table saw was moved out of the way. The solution is a very big extension cord. The options for this that I had found commercially were in excess of $150. So, I made my own. One day I will get myself in trouble by playing around with high voltage. But not yet. This extension cord is going to outlive me.
After re-sawing my floorboards, they were very rough. I knew what I was getting into when I decided that they needed to be thinner. The weight savings by cutting them down were too much of a benefit for me to ignore, even though that decision slowed progress until I had both band saw and thickness planer. After nearly a full year of saving for those tools and halting progress on the canoe, I finally had everything that I needed.
That brings us to present day. Between Summer ’24 and Spring ’25 I did no work on the canoe. I had everything that I needed, except motivation. Now with some shift in priorities that have ebbed in my hiatus, I am back to work.
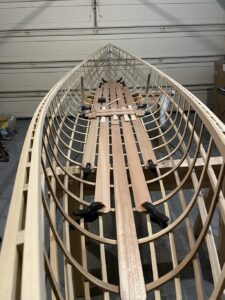
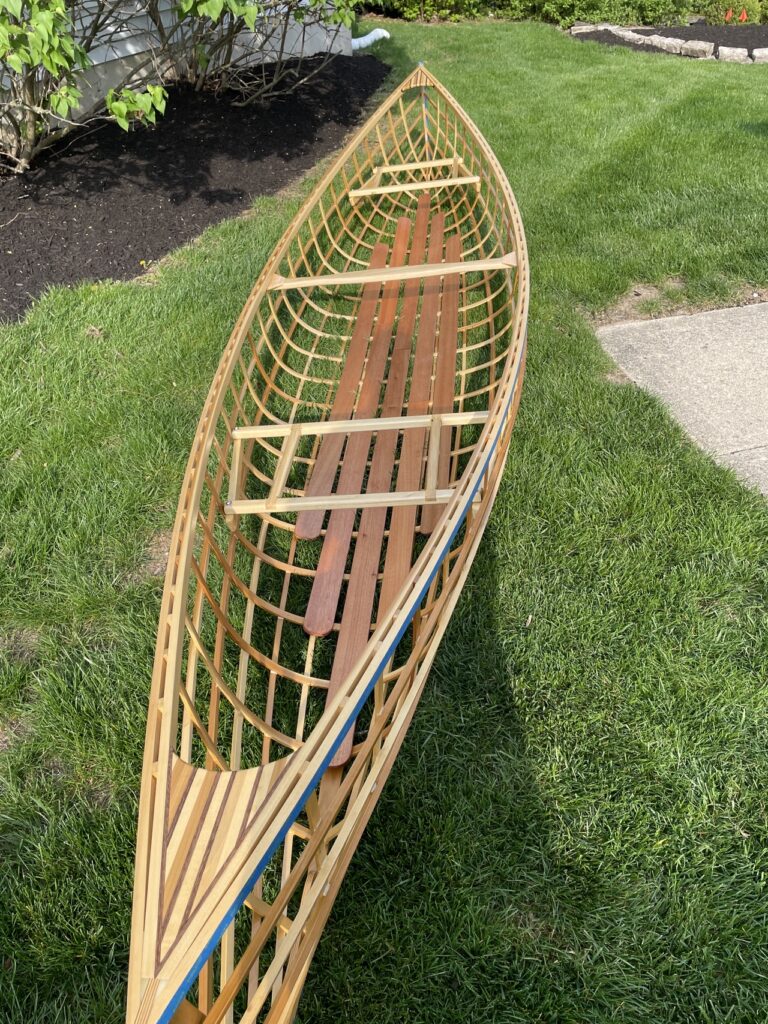
The floorboards are a re-sawn mahogany. The center board and two next to it have been scarf jointed like the stringers as the original stock is much shorter than needed for a 16′ canoe. In the boat, nothing is flat, and nothing is quite perfectly uniform. Getting a flat board to sit in the bow and stern of the boat where the ribs have the steepest bend is not possible without some work. So, while most of the ribs are flat enough to support the floorboard, there are four ribs that cannot. For these, scrap mahogany is shaped to fill the gap in between rib and sole. So far only the center board has been fitted, and I think the other four will not need this treatment. I have strayed some from the plans here with my build. The plans call for only three floorboards in the sole, but I have opted for five. The benefit of this is that Liz and I will be less likely to step on the skin of the canoe due to the wider floor. The downside is that it will be harder to clean underneath the additional boards, and the bigger downside, weight. Since Liz has never paddled a canoe, and it has been many years for me, I thought that the additional creature comfort of a wide floor would be worth the weight. Also, it looks damn nice if I say so.

April 25, 2025: Woodwork Finished
This feels like a huge step forward. The floors are in, the center thwart is finished, and the seat frames are built. That marks an end of all the boat woodwork before I start the finishing and skinning process.
The floorboards were a huge part of what delayed work over last summer. Now that they are done, I couldn’t be happier. Not only does the dark mahogany look gorgeous against the lighter poplar, but it also added a ton of strength to the overall hull. The floorboards sandwich the ribs against the stringers in certain areas, which makes a truss structure like the gunnels that is incredibly strong.
The center thwart, or yoke, serves two purposes. The first is as a thwart. Since the boat has very little decking, the thwart holds the gunnels apart when the boat is loaded. The envelope of the hull under load wants to crush inward, and the thwart keeps it held apart. The second purpose, is as a yoke. The yoke is used to carry the boat, inverted, on the shoulders. This is one of the main reasons for building a boat like this. It is much lighter than almost every canoe of similar length with the exception of carbon fiber canoes. Believe it or not, my boat will end up being cheaper than those carbon boats even when considering the cost of the tools I bought to build it!
The seat frames were the final bit of woodwork done on the canoe. I have yet to lace the seat onto the frames, but the frames are done. Typically a canoe seat is mounted in tension underneath the gunnel but mine are not. Due to some changes in my build from the original design, mine are mounted a little differently. I wanted these to be removable as the covering will have to be replaced periodically over the life of the canoe. So, I created mounts for the seat frames to sit on top of, then bolted them down. These are the only part of the boat that has used metal fasteners. This whole process ended up being more challenging than I thought it would, and I’m still not sure that I am happy with the outcome, but I am happy to move on.
May 2, 2025 Skin-on-frame
Thanks to some time off of work, I feel I have made some quick progress on the project. The skin has finally been added, and it really looks like a boat now.
The skin is a canvas-like material called Dacron with an underlayment of Kevlar. The kevlar is woven across the outside frame of the canoe. This does two things; first, it provides torsional strength to the structure to keep it from twisting out of shape if rowers sit on opposite sides of the canoe. Second, it provides additional support to the dacron in between the lengthwise stringers.
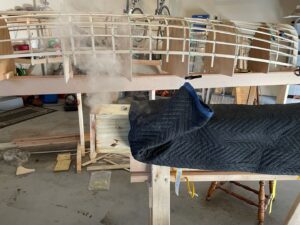
Installing the Kevlar was not documented as well as I would have liked in the blueprints. First I had to prepare two pieces of heat-n-bond tape to the sides of every rib. Heat-n-bond is a hot glue tape typically used for sewing, and applied with an iron. In this case it is used to hold down the ends of the kevlar to the gunnels of the boat. After installing, the strings are then wet with varnish. When wet, the kevlar is loose, so it must be re-tightened. This stuff is very hard on the hands. It is incredibly tough under tension, and always feels like it is about to cut through the fingers. Unfortunately the Dacron is also ironed on to the gunnels, so while heating the heat-n-bond for the dacron, the kevlar is loosed.
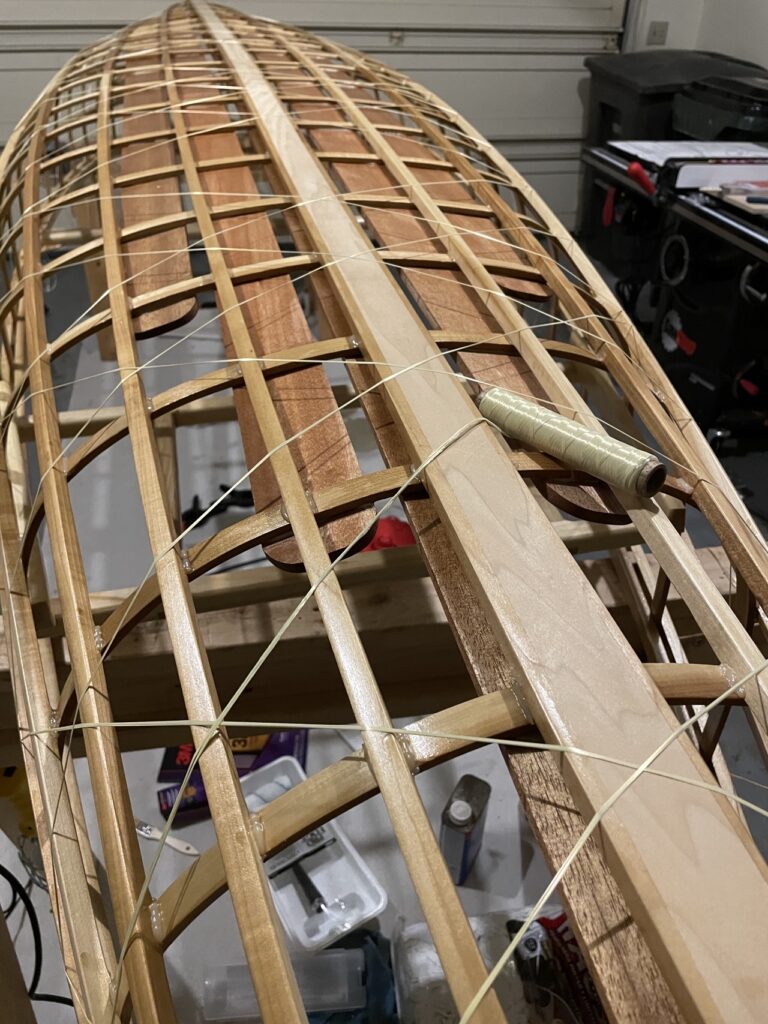
After the Kevlar was fully installed and tight the Dacron is draped over the frame. This process was easier than the blueprints made it seem. The skin was fairly forgiving when securing with the heat-n-bond, and I was able to get it fairly tight without much heat shrinking. The biggest challenge of this part is the ends of the boat which need to be very tidy. Luckily that part is documented well, and there are supplemental instructions on YouTube.
My to-do list is shrinking quickly, and I’m growing more excited to get out onto the water. With the skin on, my canoe actually looks like a boat.